What is Vacuum Casting? Vacuum casting is a highly versatile manufacturing process. It produces high-quality plastic and rubber components. First, engineers prepare a meticulous master model. Next, they create a flexible silicone mold. Then, liquid polyurethane resins are poured inside. Crucially, this happens under strict vacuum conditions. Therefore, the process prevents trapped air bubbles. As a result, it ensures precise, defect-free parts. These parts match injection-molding grades perfectly.
Today’s manufacturing landscape moves very fast. Bringing a new product to market requires speed. Furthermore, it demands precision and cost-efficiency. Product engineers and industrial designers face huge challenges. They must produce high-fidelity prototypes quickly. Moreover, they need low-volume production runs. However, hard tooling requires astronomical capital expenditures. Vacuum casting solves this problem directly. Consequently, it acts as the ultimate bridge. It connects rapid prototyping directly with mass production.
This comprehensive guide explores the process deeply. First, we analyze its technical nuances. Next, we look at mechanical advantages. In addition, we review material capabilities. Finally, we compare it against traditional injection molding. You might be validating a medical device design. Alternatively, you could be manufacturing automotive components. Perhaps you are running a consumer electronics batch. Regardless, understanding vacuum casting is essential. Thus, it will optimize your manufacturing workflow effectively.
What is Vacuum Casting?
Vacuum casting is an advanced copying technique. Manufacturers use it for small series production. It is highly ideal for functional plastic or rubber parts. At its core, the methodology relies on a “master model”. This model forms a resilient silicone mold initially. First, the mold is cured completely. Then, technicians cut it open carefully. After that, it becomes an empty cavity. Finally, various two-component polyurethane (PU) resins are cast inside.
The Role of the Vacuum Chamber
The defining characteristic of this process is the vacuum. Mixing and pouring occur inside a specialized chamber. In standard casting, mixing introduces microscopic air bubbles. Normally, these bubbles get trapped easily. They stick against the mold walls. Alternatively, they hide within the part’s cross-section. Consequently, this leads to structural weaknesses. Moreover, it causes unacceptable surface blemishes.
Therefore, executing the pour in a vacuum is vital. The machine removes all ambient air pressure. This allows trapped gases to expand rapidly. Next, the gases rise to the surface. Finally, the machine evacuates them before curing. The result is a fully dense part. It perfectly replicates the master model’s geometry. Furthermore, it captures the exact surface finish.
For B2B manufacturing, this process represents a “sweet spot”. It is perfect for 10 to 200 units. Indeed, it offers great aesthetic fidelity. It matches the mechanical strength of injection molding exactly. Yet, it operates on a fraction of the cost.
The Vacuum Casting Process: Step-by-Step Technical Guide
The success of vacuum casting relies heavily on a strict procedure. Each step requires skilled craftsmanship. Furthermore, precise environmental controls guarantee the highest quality output. Below is the detailed breakdown of the entire process.
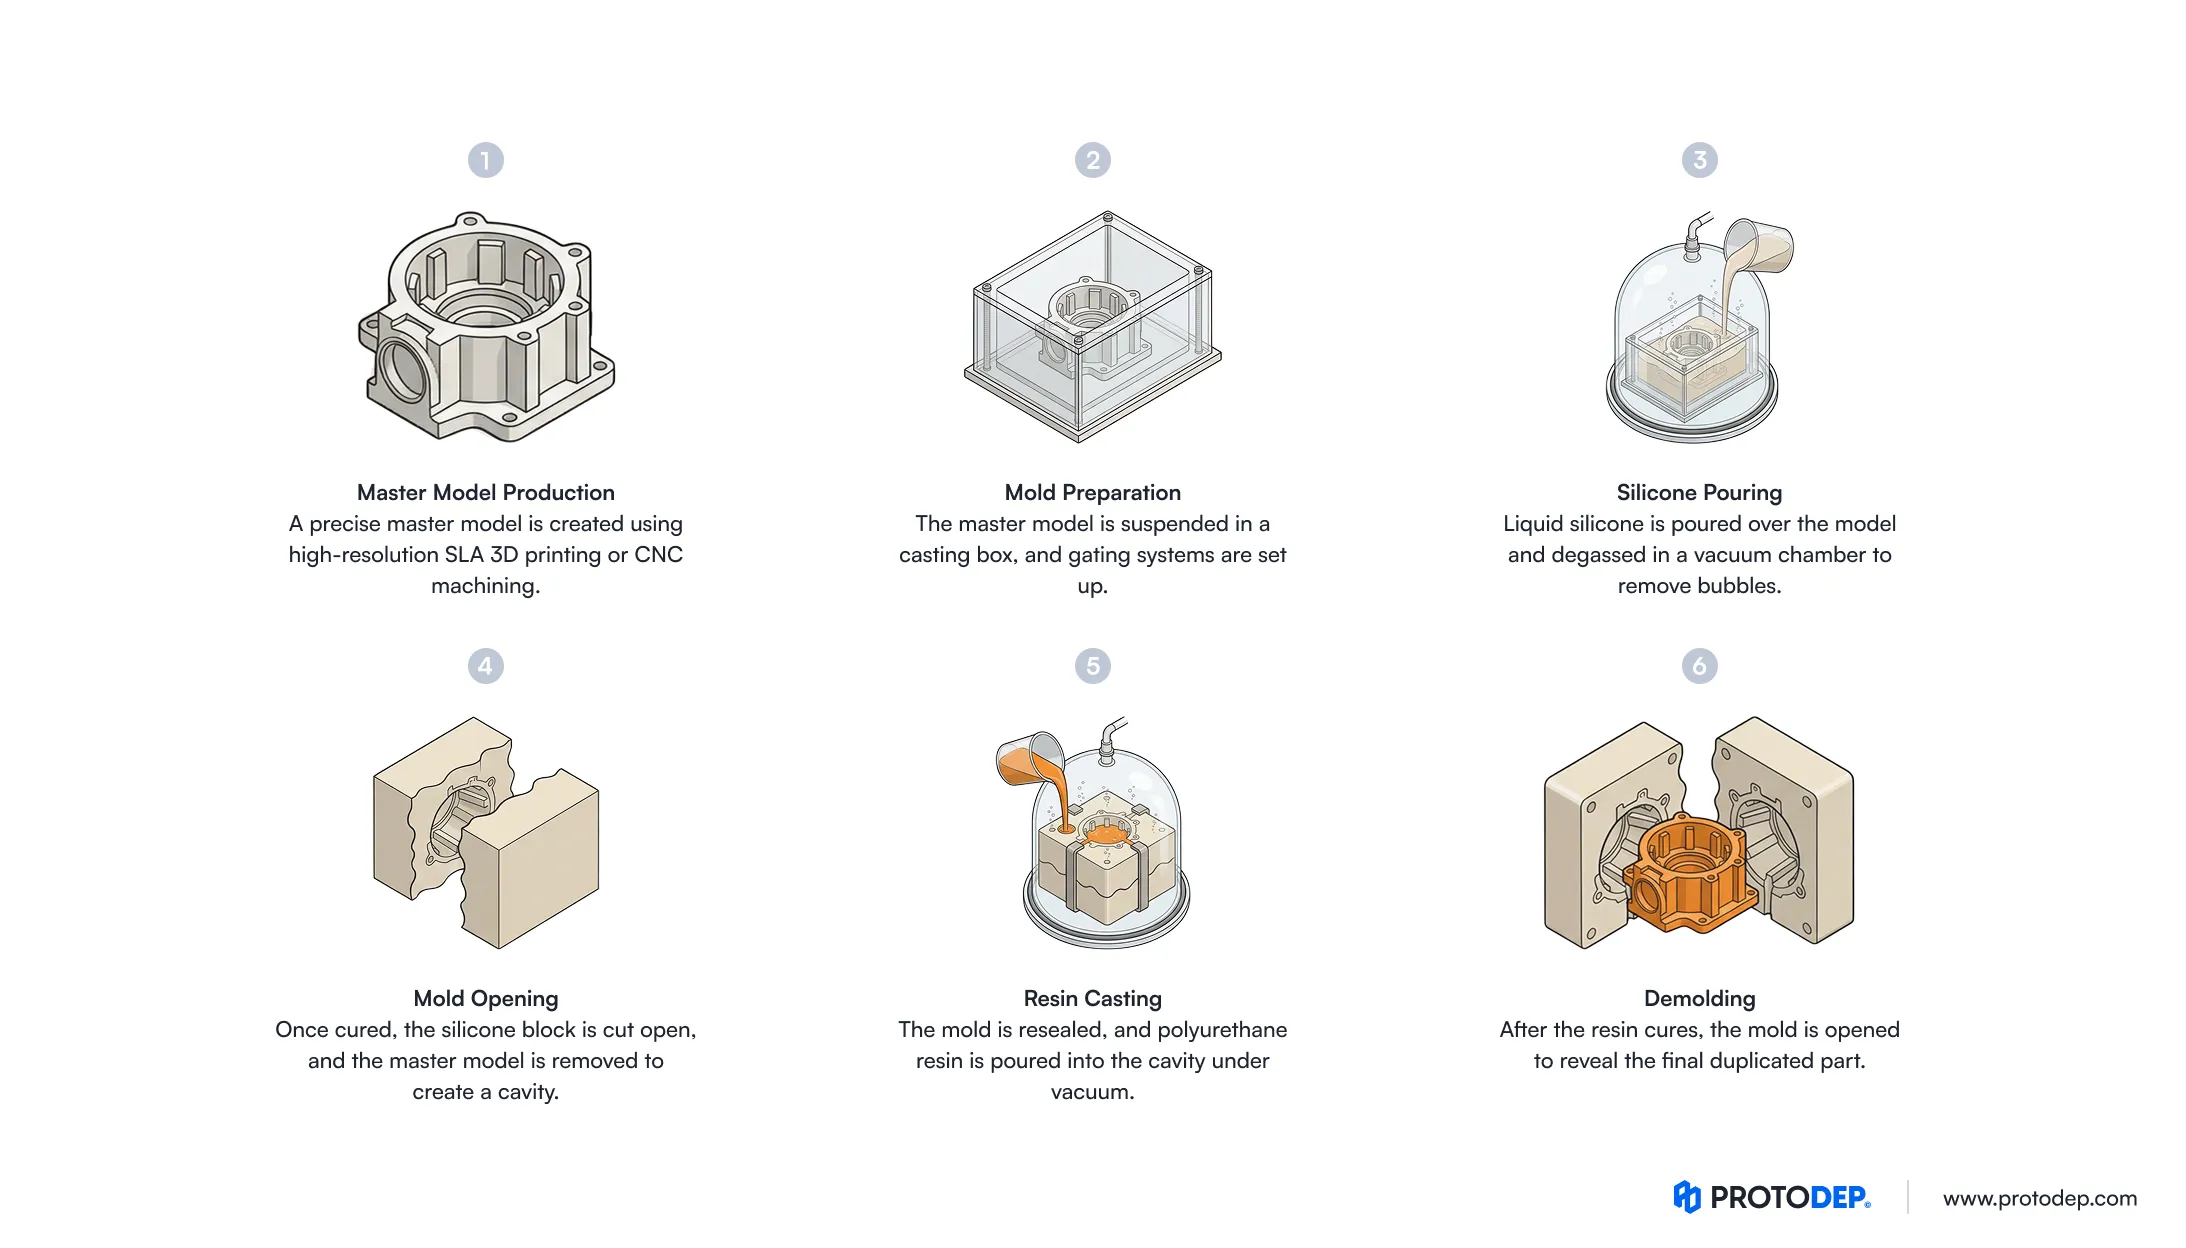
Step 1: Master Model Production
The entire process hinges on the master model. Liquid silicone conforms perfectly to any surface. Therefore, final parts inherit every single detail. This includes any microscopic flaws on the master.
SLA 3D Printing or CNC Machining
Typically, engineers produce the master using High-Resolution Resin Printing (SLA/DLP). SLA utilizes a precise UV laser. It cures photosensitive resin layer by layer. To understand this underlying technology better, read our detailed guide on What Is SLA and DLP 3D Printing? Working Principle, Advantages, and Comparison. Thus, it offers exceptional dimensional accuracy. Sometimes, parts require extreme dimensional stability. In these cases, 5-axis CNC machining is utilized. Machinists mill a stable block of aluminum. Alternatively, they use a high density tooling board.
Surface Finishing and Preparation
Once fabricated, the master undergoes rigorous post-processing. First, technicians carefully sand the model. They remove residual layer lines completely. Depending on requirements, they polish the master heavily. It can achieve a mirror-like gloss. Alternatively, they paint it with specific textures. Next, they clean the master thoroughly. Then, they coat it with a release agent. Finally, engineers apply a shrinkage compensation factor. This accounts for natural thermal shrinkage later.
Step 2: Creating the Silicone Mold
Now, the focus shifts to creating the mold itself. Technicians make a flexible RTV silicone mold. This will serve as the primary production tool.
Casting Box and Gating System Setup
First, the master model is suspended. It hangs inside a rigid casting box. Engineers attach a carefully designed gating system. Moreover, they add necessary air vents. The gating system dictates resin entry points. Meanwhile, vents allow displaced air to escape. Proper placement of these gates is absolutely crucial. Incorrect placement leads to incomplete fills. Furthermore, it causes visible weld lines. Masking tape and alignment pins are also placed. Thus, the mold reassembles accurately later.
Pouring the Silicone and Vacuum Degassing
Liquid RTV2 molding silicone is mixed with a curing agent. Before pouring, workers place the mixture in a vacuum. This step removes trapped air completely. Once degassed, they pour the silicone carefully. It completely encapsulates the master model. Next, the entire box goes into the vacuum chamber again. This secondary vacuum stage is very important. It prevents air bubbles in the mold. Consequently, liquid silicone flows into deep undercuts. It fills micro-textures and blind holes perfectly.
Curing the Silicone
Then, the mold goes to a temperature-controlled oven. Temperatures are typically set between 40°C and 45°C. It cures there for 12 to 24 hours. After that, the silicone is fully vulcanized. It transitions from a viscous liquid. Finally, it becomes a robust, flexible rubber block.
Cutting and Demolding the Master
A skilled technician uses a highly specialized technique. They cut the cured silicone block open. First, they use a sharp scalpel. However, the cut is not a straight line. Instead, it is made in a wavy pattern. This interlocking cut ensures perfect alignment later. Therefore, it prevents step-mismatches on parts. Finally, the master model is extracted carefully. A pristine negative cavity remains inside.
Step 3: The Vacuum Casting Stage
The mold is now ready for production. Actual polyurethane prototypes are manufactured in this stage.
Mold Preparation
First, workers spray the internal cavity lightly. They use a special mold release agent. This facilitates easy part removal later. Next, the two mold halves are securely taped together. Often, they are clamped between rigid plates. This prevents the flexible mold from bulging. Finally, the assembled mold is placed inside the machine.
Mixing Polyurethane Resins
Polyurethane resins are two-component systems. They react chemically when combined together. Before mixing, workers heat the resin components. This reduces their overall viscosity. Inside the chamber, the machine acts automatically. It dispenses precise ratios of both parts. Then, they go into a single mixing cup.
Pouring Under Vacuum
First, the chamber is evacuated of air. Then, mechanical agitators mix the components thoroughly. Because mixing happens in a vacuum, no air enters. Next, the machine tilts the mixing cup. It pours the reactive resin into a funnel. Gravity feeds the resin into the cavity. Meanwhile, the vacuum ensures flawless filling. Once full, the vacuum is released. The sudden atmospheric pressure acts powerfully. It pushes the resin firmly against the walls. Thus, it captures flawless details.
Step 4: Curing and Demolding
The final steps involve solidifying the resin. Then, the part is prepared for end-use.
Thermal Curing
Workers remove the filled mold from the machine. Next, they place it into a curing oven. The temperature is typically around 70°C. This heat accelerates the exothermic chemical reaction. Curing times range from 45 minutes to several hours. Small parts cure relatively fast. However, massive components take much longer.
Part Extraction and Post-Processing
After curing, the mold leaves the oven. Technicians carefully pull apart the silicone mold. Then, they reveal the solidified polyurethane part. Silicone flexibility is a huge advantage here. Complex parts are extracted without damage. This is impossible with rigid steel molds. Finally, the post-processing phase begins. Workers cut away gating sprues manually. They sand attachment points meticulously. If required, parts undergo secondary operations. For example, they might be painted or silk-screened.
Advantages of Vacuum Casting
Vacuum casting offers many strategic advantages. Therefore, it is indispensable for hardware development.
Advantages of FDM 3D Printing
Exceptional Surface Finish: Silicone has incredibly low surface tension. Therefore, it conforms perfectly under vacuum. Cast parts replicate the master model flawlessly. For example, a high-gloss finish transfers perfectly.
Drastically Reduced Lead Times: Steel injection molds take 4 to 12 weeks. In contrast, vacuum casting is much faster. A first batch is delivered in just 7 days. Thus, this turnaround helps hit aggressive deadlines.
High Material Versatility: The process supports many plastic types. Modern polyurethane resins simulate production materials well. For instance, you can use ABS-like resins. Alternatively, you can use flexible rubber resins.
Complex Geometries and Undercuts: The silicone mold is highly flexible. Because of this, complex parts demold easily. Engineers can prototype severe undercuts freely. They do not worry about strict DFM (Design for Manufacturing) rules.
Elimination of Air Inclusions: The vacuum ensures parts are completely dense. This is critical for mechanical integrity. Internal voids act as dangerous stress concentrators. However, vacuum casting completely negates this risk.
Overmolding and Insert Casting: The process readily supports insert molding. First, workers suspend metal components in the mold. Then, resin is poured over them. Moreover, two-stage vacuum casting simulates 2K injection molding perfectly.
Disadvantages and Limitations
Vacuum casting is highly advantageous generally. However, it is not a universal solution. B2B decision-makers must understand its specific limitations.
Disadvantages of FDM 3D Printing
Limited Mold Life: Silicone molds have a very short lifespan. The curing chemical reaction is quite aggressive. Over time, the silicone degrades significantly. It loses flexibility and becomes brittle. Consequently, a single mold yields only 15 to 25 parts.
Material Differences: Polyurethane resins simulate production thermoplastics well. However, they are not exactly the same. Polyurethanes are thermosetting polymers originally. Therefore, specific chemical resistances might differ slightly.
Not Suited for High Volumes: The process relies on manual labor heavily. Also, mold life is very short. Thus, it cannot scale beyond a few hundred units. For higher volumes, conventional rapid tooling or injection molding is cheaper.
Thermal Shrinkage Tolerances: The process involves two separate shrinkage phases. First, the silicone shrinks during curing. Second, the polyurethane resin shrinks later. Therefore, maintaining extremely tight micro-tolerances is difficult.
Vacuum Casting vs. Injection Molding
We must compare vacuum casting directly against injection molding. Injection molding is the industry standard today. It injects molten thermoplastic into steel cavities. This happens under immense mechanical pressure.
The fundamental difference lies in capital expenditure. Injection molding requires massive upfront costs. However, the per-part operational cost is minimal. Conversely, vacuum casting requires minimal upfront investment. Yet, manual labor makes per-part costs higher.
Below is a detailed technical comparison table. It helps engineering managers make correct tooling decisions.
| Feature / Metric | Vacuum Casting | Plastic Injection Molding |
|---|---|---|
| Tooling Cost (CapEx) | Very Low ($200 – $1,000) | Very High ($5,000 – $100,000+) |
| Tooling Lead Time | Fast (3 to 10 Days) | Slow (4 to 12 Weeks) |
| Unit Part Cost (OpEx) | High ($10 – $150+) | Very Low ($0.05 – $5.00) |
| Ideal Volume | 10 to 200 units | 1,000+ units |
| Mold Lifespan | 15 – 25 shots | 10,000+ shots |
| Design Flexibility | Extremely High (Undercuts easy) | Strict (Requires expensive slides) |
As illustrated, vacuum casting provides a clear cost advantage. This is true when production volumes are low. Companies bypass massive tooling investments easily. Furthermore, they still acquire mass-production quality parts.
When to Choose Vacuum Casting?
Vacuum casting has a unique manufacturing profile. It offers rapid speed and low tooling costs. Therefore, it is optimal for specific scenarios.
- Functional Prototyping: Engineers must validate designs early. Vacuum cast parts are very strong mechanically. Thus, they undergo rigorous drop testing successfully.
- Beta Testing and User Trials: Companies often distribute beta units to hospitals. 3D printed parts lack regulatory quality. However, vacuum casting provides end-use aesthetics perfectly.
- Bridge to Production: Steel injection molds often take 8 weeks. Meanwhile, vacuum casting supplies initial early-bird units. Consequently, it bridges the gap to mass production.
- Low-Volume Manufacturing: Many specialized B2B devices have low annual demand. Sometimes, companies only need 100 units yearly. In these cases, vacuum casting acts as the final manufacturing method.
- Complex Multi-Material Prototypes: Some products require rigid housings with rubber buttons. Overmolding via vacuum casting solves this. Furthermore, it is the fastest way to achieve this.
Materials Used in Vacuum Casting
The magic relies heavily on polymer chemistry. Manufacturers utilize advanced two-part polyurethane resins. These resins simulate standard production plastics beautifully. Below are key B2B materials categories.
ABS-Like Resins
These are formulated to mimic ABS plastic. They are the workhorse materials of this process. For example, a PU Casting Resin (ABS-Like) offers excellent dimensional stability. They are widely used for electronic housings.
Polycarbonate (PC) and Nylon-Like Resins
Sometimes, high stiffness is absolutely paramount. In these cases, PC-like or Technical PU Resin (Nylon-Like) polyurethanes are selected. These materials are tougher than ABS-like resins. Thus, they are frequently used in automotive components.
Clear and Optical Resins
Specific PU resins cure completely water-clear. Technicians pour them into polished silicone molds. Consequently, they produce optically transparent parts using an Optical Clear Casting Resin. They are essential for prototyping clear displays.
Rubber and Elastomeric Resins
These resins cure into flexible elastomers. They are categorized by their Shore A hardness. They range from very soft to hard rubber. Therefore, a Flexible Casting Resin (PP-Like) is perfect for prototyping seals.
High-Temperature Resins
Standard PU resins deflect under moderate heat. However, specialized high-temp formulations exist today. They withstand prolonged exposure to 120°C easily. Thus, they are critical for under-the-hood automotive parts.
Flame Retardant Resins
Safety is paramount for electronic enclosures. Certain polyurethanes meet strict UL94 V-0 ratings. By using a Flame Retardant Resin, prototypes comply with stringent B2B safety tests.
Cost Logic and ROI Analysis
Understanding the cost logic is essential for managers. The financial model is front-loaded towards variable costs. Fixed costs are surprisingly low here.
Fixed Costs (CapEx)
The only fixed cost is the master model. Moreover, you must pay for the silicone mold. Producing these typically costs between $300 and $1,500. This is a truly negligible investment. In contrast, aluminum injection molds cost over $10,000.
Variable Costs (OpEx)
The per-unit cost is relatively high. First, polyurethane resins are expensive specialty chemicals. Second, the entire process is labor-intensive. A technician must manually prep every single mold. Therefore, parts might range from $15 to $200 each.
The Breakeven Point
The ROI decision depends on the breakeven point. Suppose you need exactly 50 parts. Vacuum casting might cost $2,500 total. Injection molding would cost at least $10,050. Thus, vacuum casting wins massively here.
However, suppose you need 1,000 parts. You must replace the silicone mold 40 times. The total cost becomes $70,000 easily. Meanwhile, injection molding remains around $11,000. Here, injection molding is the clear victor.
In conclusion, a golden rule applies strictly. Vacuum casting provides optimal ROI under 200 units.
Application Areas
Vacuum casting is highly versatile and reliable. Therefore, it is integrated into many manufacturing sectors.
Automotive Industry
Automotive and mobility OEMs rely on vacuum casting heavily. They use it for interior cabin mock-ups. For example, dashboard panels are cast frequently. Furthermore, transparent headlight lenses are evaluated this way.
Medical Devices
The medical and healthcare technologies sector requires highly accurate prototypes. Vacuum casting creates reliable surgical instrument models. Because molds replicate smooth surfaces, parts are clean. Thus, they are ideal for clinical trials.
Consumer Electronics
In consumer electronics, aesthetics are everything. Vacuum casting is the go-to method here. It creates realistic prototypes of smartphones and laptops. Furthermore, rubberized buttons are tested extensively.
Aerospace and Defense
Aerospace manufacturing involves very low production volumes. Vacuum casting utilizes flame-retardant resins efficiently. Manufacturers produce customized interior cabin fittings. Thus, they avoid unjustified injection molding costs.
Industrial Equipment and Robotics
Manufacturers of specialized industrial machinery and robotics use this process. They do not just use it for prototypes. Actually, they use it for end-use production. Custom sensor housings are cast economically in small batches.
Frequently Asked Questions (FAQ)
1. How long does a silicone mold last?
A standard mold yields 15 to 25 parts. The lifespan depends heavily on part geometry. Resins with high exothermic heat degrade molds faster. Additionally, sharp undercuts lower the yield significantly. However, simple geometries can reach 30 parts easily.
2. Can vacuum casting achieve transparent parts?
Yes, it is absolutely possible. First, the master model needs a mirror finish. Then, the silicone mold gets perfectly smooth walls. Next, optically clear resin is poured under vacuum. Consequently, the resulting part is highly transparent.
3. How tight are the tolerances?
Standard tolerances are generally around ± 0.15%. Because silicone is flexible, extreme micro-tolerances are impossible. Furthermore, thermal shrinkage affects the final dimensions. However, these tolerances are perfectly acceptable usually. They work well for standard mechanical assemblies.
4. Is it possible to insert-mold?
Yes, the process is excellent for insert molding. First, workers suspend threaded inserts inside the cavity. Then, the resin is poured securely around them. Moreover, two-stage overmolding is a common technique.
5. Why is the process done under a vacuum?
The vacuum environment is completely critical. When mixing resins, air is inherently introduced. Normally, these bubbles cause voids inside the part. However, a vacuum allows trapped gases to escape. Thus, it ensures a dense and perfect final part.
Conclusion and Evaluation
Vacuum casting stands as a cornerstone technology today. It bridges a perilous gap in manufacturing brilliantly. First, it avoids the fragility of 3D printing. Second, it bypasses exorbitant injection molding costs. Engineers unlock unparalleled design freedom easily.
The air bubble prevention principle is technically elegant. It ensures parts are aesthetically flawless. Furthermore, they are structurally robust for rigorous testing. Admittedly, limitations exist regarding total mold lifespan. However, the strategic deployment reduces time-to-market drastically. Consequently, it mitigates financial risks effectively.
Every B2B enterprise should consider this process. You might focus on agile product development. Alternatively, you might need customized aerospace engineering. Regardless, integrating vacuum casting is highly beneficial. Therefore, it is a true competitive imperative. Ready to start your next project? Get an instant quote today or contact us for advanced engineering support.
Quote in Seconds, Parts in Days
Upload your 3D CAD files, select your manufacturing technology, and receive an instant cost analysis. Zero wait time, no minimum order requirements.